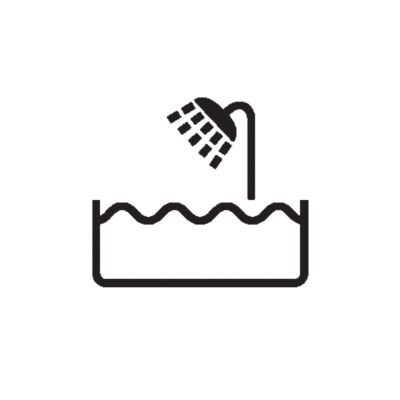
- This product is waterproof. It is suitable for use in the bath or shower and for cleaning under the tap. For safety reasons, the product can therefore only be used without cord.
- Because of hygiene, only one person should use the product.
- Switch off the product before removing or attaching attachments and before cleaning.
- Clean the product after each use.
- Only use cold or lukewarm water to clean the product.
- Never use compressed air, scouring pads, abrasive cleaning agents or aggressive liquids such as gasoline or acetone to clean the product.
- Caution: Never dry the trimmer teeth with a towel or tissue, as this may damage the trimmer teeth.
Congratulations on your purchase and welcome to Philips Norelco!
To fully benefit from the support that Philips Norelco offers, register your product at: www.norelco.com/register.
You can find the model number on the back of your product.
The full model number (e.g. QP1234/56) is located on the bottom of the packaging, your receipt or order confirmation.
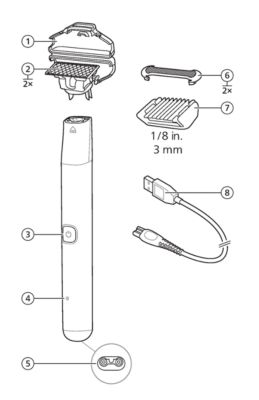
- Protection cap
- Blade
- On/off button
- Battery charging indicator
- Socket for small plug
- Skin Protect attachment for wet and dry use
- Body comb 1/8 in. (3 mm)
- USB cable
- Note: A suitable power source (e.g. Philips HQ87) is available via www.philips.com/support.
Charging OneBlade
Charge the product before first use and when the product starts working more slowly.
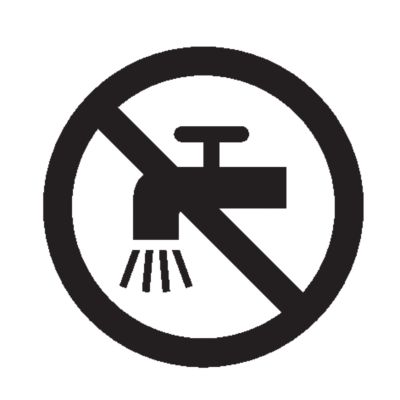
Warning: Keep the USB cable and the USB power source dry.
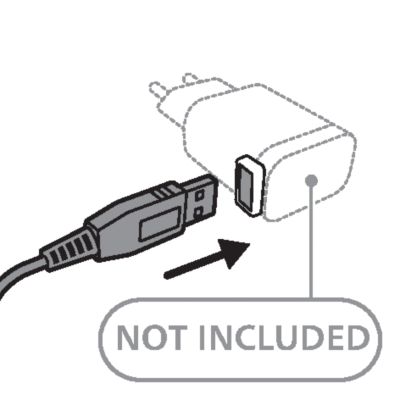
-
- Insert the small plug of the USB cable into the socket in the bottom of the handle.
-
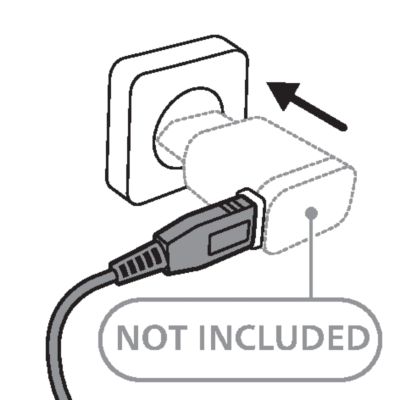
- Insert the USB plug into the USB power source (not included).
-
- Insert the USB power source into the power outlet.
-
- When the product is charging, the battery charging indicator lights up continuously.
- To fully charge the battery, let it charge for 8 hours.
- Unplug the adapter from the power source, then remove the USB power source from the handle.
- Note: for safety reasons, the product can only be used when the USB power source is not attached.
- When fully charged, the product has an operating time of 30 minutes.


Changing attachments
Attaching and detaching the blade
-
- To detach the blade from the handle, hold the blade by both short sides and lift it off the handle.
-
- To attach the blade to the handle, hold the blade by both short sides and press it onto the handle until it snaps into place.


Detaching and attaching the Skin Protect
-
- To detach the Skin Protect from the blade, hold one of the short sides of the Skin Protect between your index finger and your thumb. Use your thumb to push the upper corner of the Skin Protect upwards until released from the blade. Then gently remove the Skin Protect from the blade.
-
- To attach the Skin Protect onto the blade, hook one short end of the Skin Protect around the blade and press down on the other end until the Skin Protect snaps into place.


Attaching and detaching the body comb
-
- To attach the body comb onto the blade, hold the comb by both short sides and press it onto the blade.
-
- To detach the body comb from the blade, hold the comb by both short sides and pull it off the blade.


Turning the product on and off
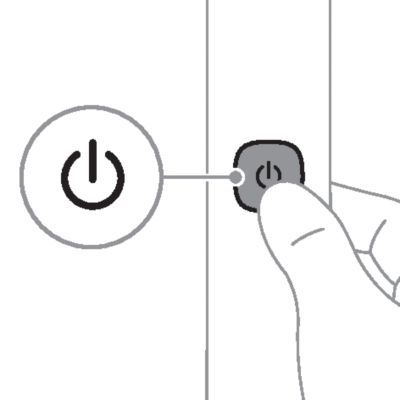
Press the on/off button once to switch the product on or off.
Before you begin
- Thoroughly clean the area to be shaved or trimmed.
- Take a position that allows you to reach your intimate area with the product, for instance:
-
- Place one leg on a bathtub or chair.
- Sit on a chair.
- Sit on the toilet.

- Spread your legs to achieve some initial stretching of the skin.
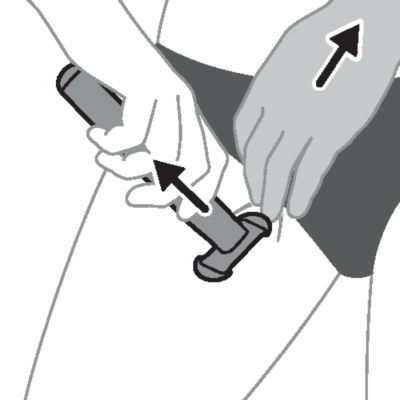
Removing hair from your intimate area
- Attach the blade with the Skin Protect onto the handle.
- Press the on/off button once to switch on the product.
-
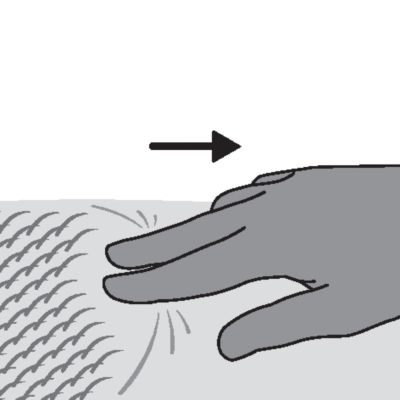
- With your free hand, stretch a small area of the skin with two fingers to make the hairs stand upright. Only place the blade on thoroughly stretched skin.
-
- Place the blade with the Skin Protect flat onto the skin. Make sure that the blade is in full contact with the skin.
-
- Move the product slowly and with light pressure against the direction of hair growth. As you move along, make sure that your skin always remains stretched.
- When you have finished, switch off the product and clean it.

Trimming with body comb
- Remove the Skin Protect from the blade.
- Attach the body comb onto the blade .
- Press the on/off button once to switch on the product.
-
- Place the body comb flat onto the skin. Make sure that the comb is in full contact with the skin.
-
- With your free hand, stretch a small area of the skin with two fingers to make the hairs stand upright. Only place the body comb on a thoroughly stretched skin.
-
- Move the product slowly and with light pressure against the direction of hair growth. As you move along, make sure that your skin always remains stretched.
- When you have finished, switch off the product and clean it.


- Switch off the product.
- Remove the Skin Protect or body comb from the blade.
- Blow off any hairs that have accumulated on the blade, Skin Protect and/or body comb.
- Switch on the product and rinse the blade with cold or lukewarm water.
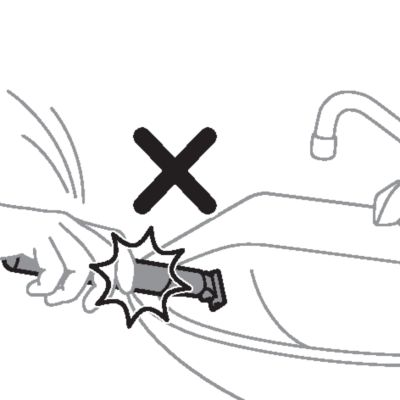
- Caution: Do not dry the blade with a towel or a tissue as this may cause damage. The blade is fragile. Handle it carefully. Do not use the product with a damaged blade.
- Rinse the Skin Protect and/or body comb with cold or lukewarm water.
- Carefully shake off excess water and let all parts air dry completely.
- Do not tap the product on the rim of the sink to remove excess water, as this may cause damage.

When to replace the blade
For optimal cutting and gliding performance, we advise you to replace the blade every 4 months or when it no longer provides the shaving or trimming results you expect. Depending on your usage behavior, the exact lifetime of the blade could be longer or shorter.
If blade is damaged
If you notice any damage on your blade, replace it immediately.
Replacing the blade QP6xxx
- Switch off the product.
-
- Hold the blade by both short sides and detach it by lifting it off the handle.
-
- Hold the new blade by both short sides and press it onto the handle (‘click’). When you hear a click, the new blade is placed correctly and ready for use.
Note: Be careful, the edges of the blade are sharp.
Replacement parts and accessories may be purchased at a store near you or on our website www.philips.com/store.
The following parts are available:
- QP229 Blade 2-pack
For assistance, visit our website: www.philips.com/support or call toll free 1-800-243-3050.
- This product contains a rechargeable NiMH battery which must be disposed of properly.
- Contact your local town or city officials for battery disposal information. You can also call 1-800-822-8837 or visit: www.call2recycle.org for battery drop-off locations.
- For assistance, visit our website: www.philips.com/support or call 1-800-243-3050 toll free.
- Your product is designed and manufactured with high quality materials and components, which can be recycled and reused. For recycling information, please contact your local waste management facilities or visit: www.recycle.philips.com.

Philips North America LLC warrants this new product against defects in materials or workmanship for a period of two years from the date of purchase, and agrees to repair or replace any defective product without charge.
IMPORTANT: This warranty does not cover damage resulting from accident, misuse or abuse, lack of reasonable care, the affixing of any attachment not provided with the product or loss of parts or subjecting the product to any but the specified voltage.*
The blade is not covered by the terms of this warranty because it is subject to wear and tear.
NO RESPONSIBILITY IS ASSUMED FOR ANY SPECIAL, INCIDENTAL OR CONSEQUENTIAL DAMAGES.
In order to obtain warranty service, simply go to www.philips.com/support. It is suggested that for your protection you return shipments of product by insured mail, insurance prepaid. Damage occurring during shipment is not covered by this warranty.
NOTE: No other warranty, written or oral, is authorized by Philips North America LLC.
This warranty gives you specific legal rights, and you may also have other rights which vary from state to state. Some states do not allow the exclusion or limitation of incidental or consequential damages, so the above exclusion and limitations may not apply to you.
*Read enclosed instructions carefully.
If you are not fully satisfied with your product send the product back and we’ll refund you the full purchase price.
The product must be shipped prepaid by insured mail, insurance prepaid, have the original sales receipt, indicating purchase price and date of purchase.
We cannot be responsible for lost mail.
The product must be postmarked no later than 45 days after the date of purchase. Philips reserves the right to verify the purchase price of the product and limit refunds not to exceed suggested retail price.
To obtain the money-back guarantee service, please go to www.PhilipsMoneyBack.com and follow the simple 3-step process.
Delivery of refund check will occur 6–8 weeks after receipt of returned product.
")
")
")
")
")